


Hey guys, in this post I'll be taking you through the process of creating a database and the thoughts that go into it from the very beginning.
This is my very first technical blog, so I hope you are able to understand what you came looking for :)
I learnt this for an academic project I did for a semester and I can easily use it as an example here. However, that project was a work of a team, not just me and also it is quite extensive to explain here, so I'll be taking a simpler example to walk you through this. Let's start!
Disclaimer: All the media in the post is my property unless mentioned otherwise.
What you'll learn:
- Thought process before you make a database,
- Creating Relational model,
- Using XAMPP to create a local server to host the database on,
- SQL syntax to create tables and add data,
- Perform queries on the database to see if it is working as required.
1. Creating a layout for the data
Suppose you have a car rental agency and you need to manage all the information related to your service.
Let's start with the basic, as a car rental agency, you maintain records of 2 types of cars:
- Rented
- For-rent.
So, we have divided all the cars into 2 categories, going further you can list down all the sub-categories of each type of car. For example, a rented car will need the details of the lessee(person who has rented the car) and also the return dates and such.
You can write down all such properties you can think of for both the types. Below is my rough sketch of how I divided them:
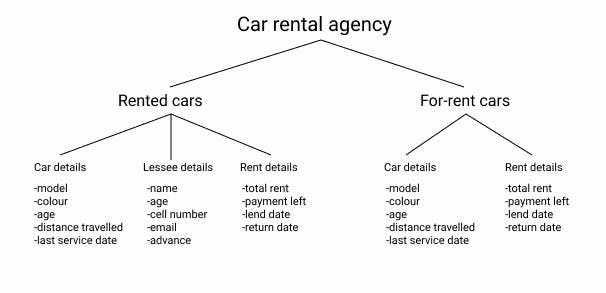
The aim of this is that you can list down all the properties you want to store in the database so that you have a clear picture of how it looks.
You can even add more aspects to it such as, a separate section for your employees, another section for all the people who have rented from your agency before and a lot more.
2. Creating a Relational Model
Before creating a model, there are a few things to keep in mind.
- Data stored in a database is in the form of
Tables, - The columns of the tables are called
Attributes, - The rows of the tables(except table headings) are called
Instances, - All the tables have exactly one
Primary Key(explained later) and - Tables are interconnected to minimise data redundancy.
What is a primary key?
Suppose a table in your database stores car details such as model, colour and so on. Now what if you rented a car of a certain model and need to put that car in the category of rented cars but another car of the same model and colour also exists in the table. How will you differentiate between them?
For this, you can give an ID to each car, a car will have only one ID and no two cars can have the same ID. This is just how we used to have Roll Numbers in school, it helped in differentiating between students. This ID attribute is called a primary key.
Primary Keys are essential not only for this reason but it also helps in connecting one table with other, which is another important feature of a database.
Fun-fact: Primary keys are not necessarily single attributes, i.e. primary keys can also be a combination of two or more attributes as long as that combination is also unique for every instance.
Here, you can also add the attribute of car_number in your database because all the vehicles have different numbers. However, since using IDs is more accessible, we'll be using them. Feel free to do whatever you want to!
How to make a relational model?
Relational model is a way to structure and connect data from one or more tables so that it's use can be more efficient.
To make one, first list down all the tables you need in your database, somewhat like what we did earlier but now by being more specific about Attribute names and more. This needs to be well thought of, because the whole database will be made based on your relational model.
Here is what I came up with:
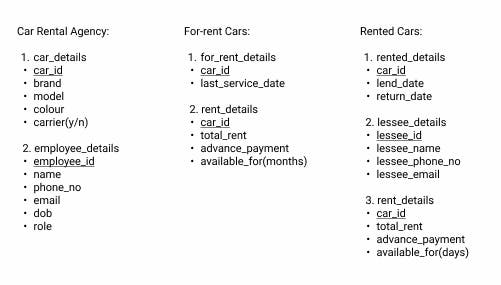 Here, there are table names and below them the list of attributes for that table. The underlined attributes are primary keys. The values in brackets are the units in which the respective attributes are measured.
NOTE: 'car_id' is the primary key in a lot of tables other than 'car_details' table, however, in the other tables 'car_id' will act as a Foreign key(foreign because it is coming from another table).
Now that you have your list of tables and attributes, you can make your relational model.
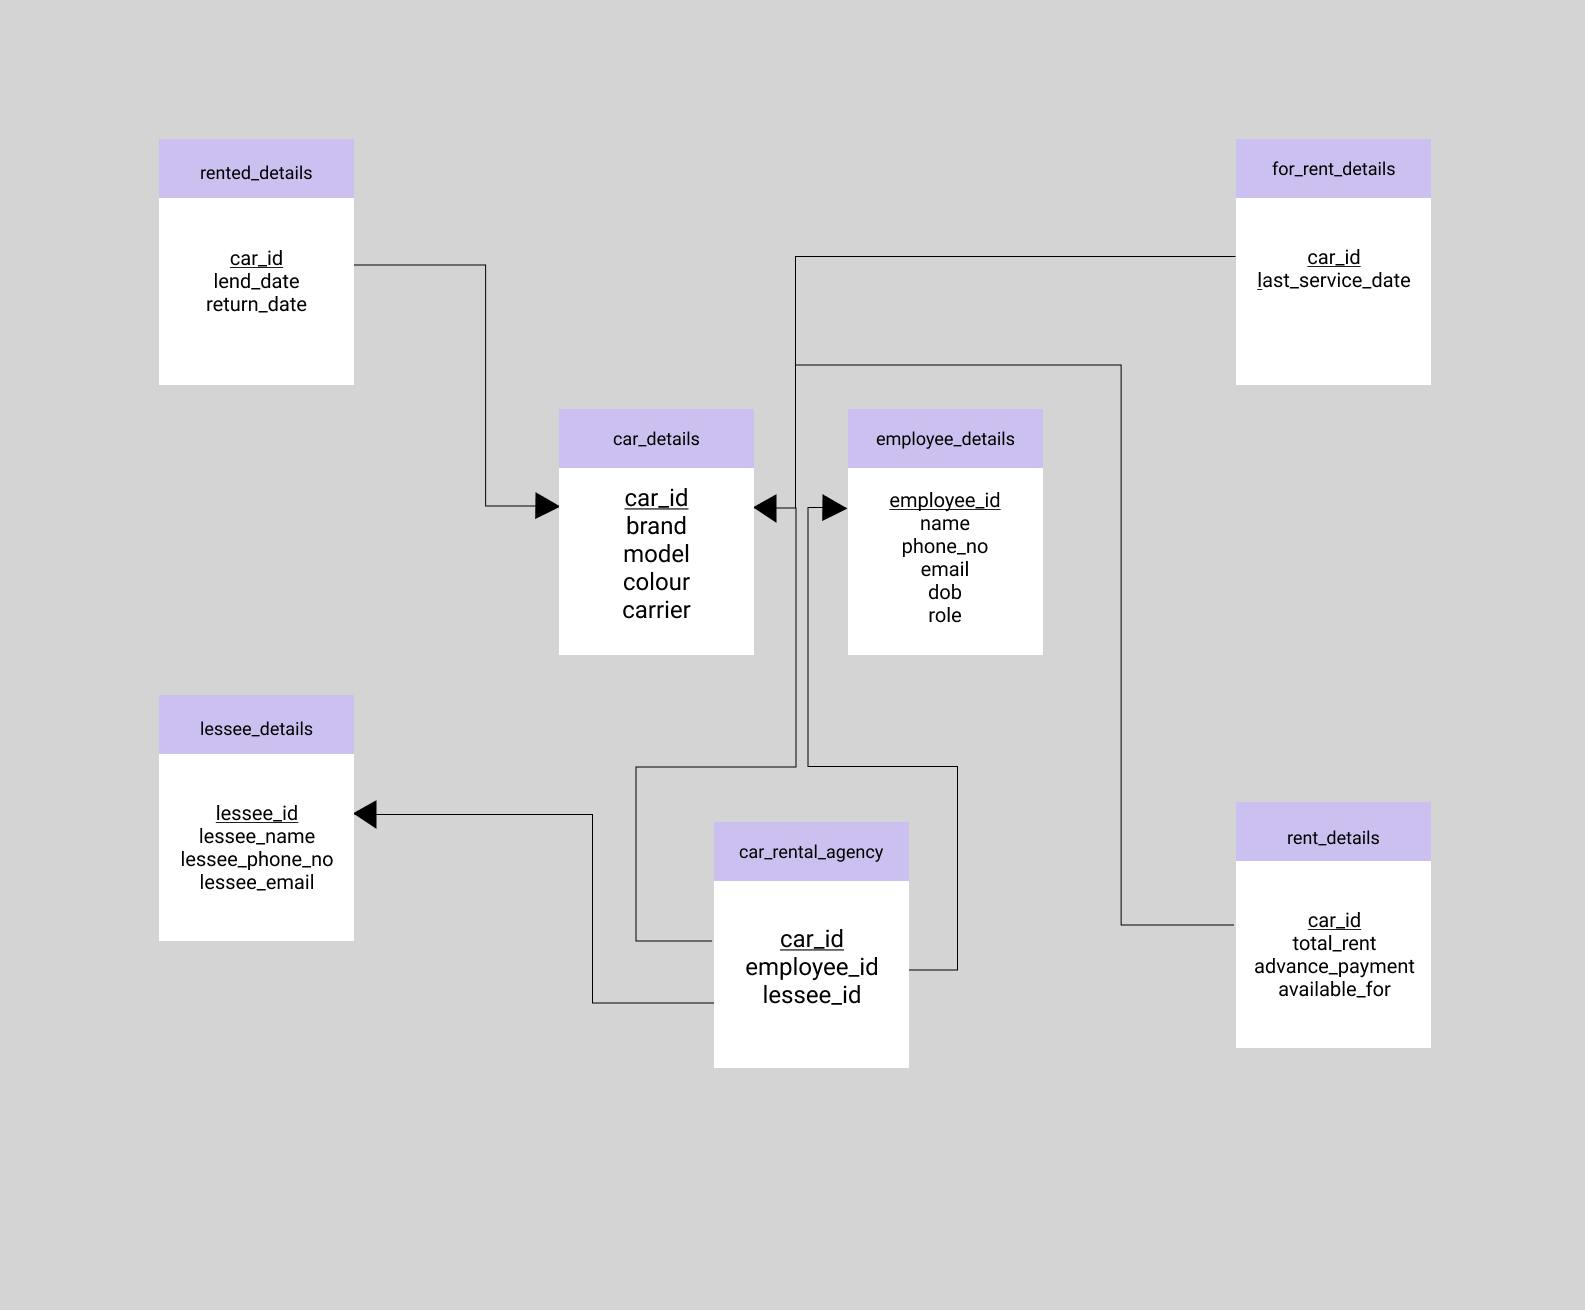 I created this model in Figma , however, you can use whatever you like
Here, the arrow pointers represent the primary keys and the tails represent the foreign keys.
(I have added another table so that the rest of the tables can stay connected to at least one other.) The Relational model is done.
3. Using XAMPP and hosting the database.
XAMPP is a web server that is:
- free
- open-source
- cross-platform
We'll be using this to host our database.
You can Download XAMPP and install it on your device to get started.
Once installed, you can launch it to see a control panel like this: (I'm using Windows and this is how it looks here, however it may vary depending on the operating system)
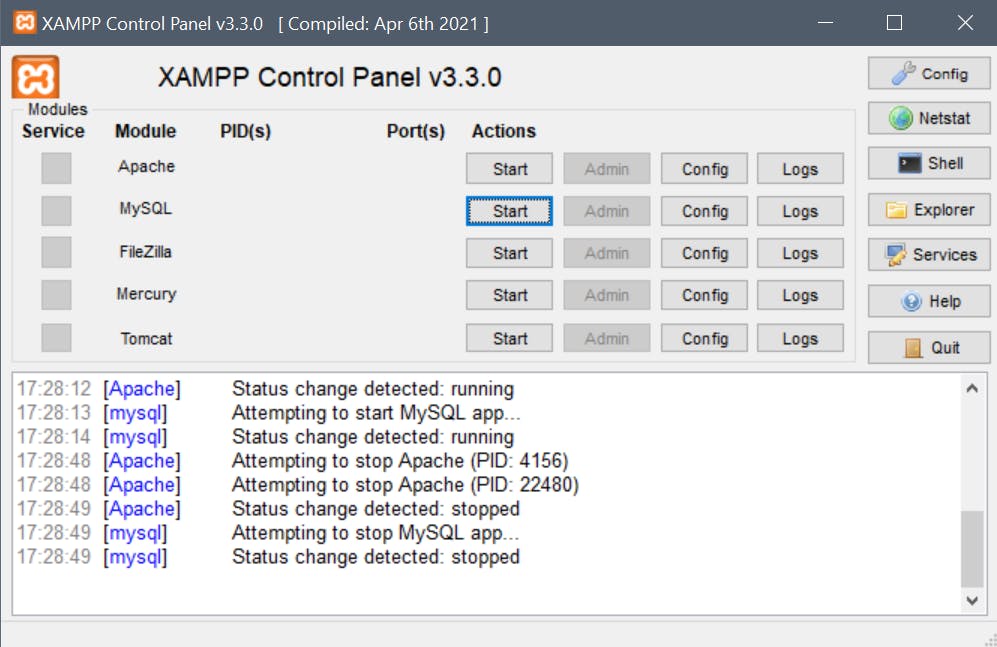
Now, we need to start the server so click on 'Start' for 'Apache' and 'MySQL' modules.
After that click on 'Admin' button on the 'MySQL' module which will open a server on your browser like this:
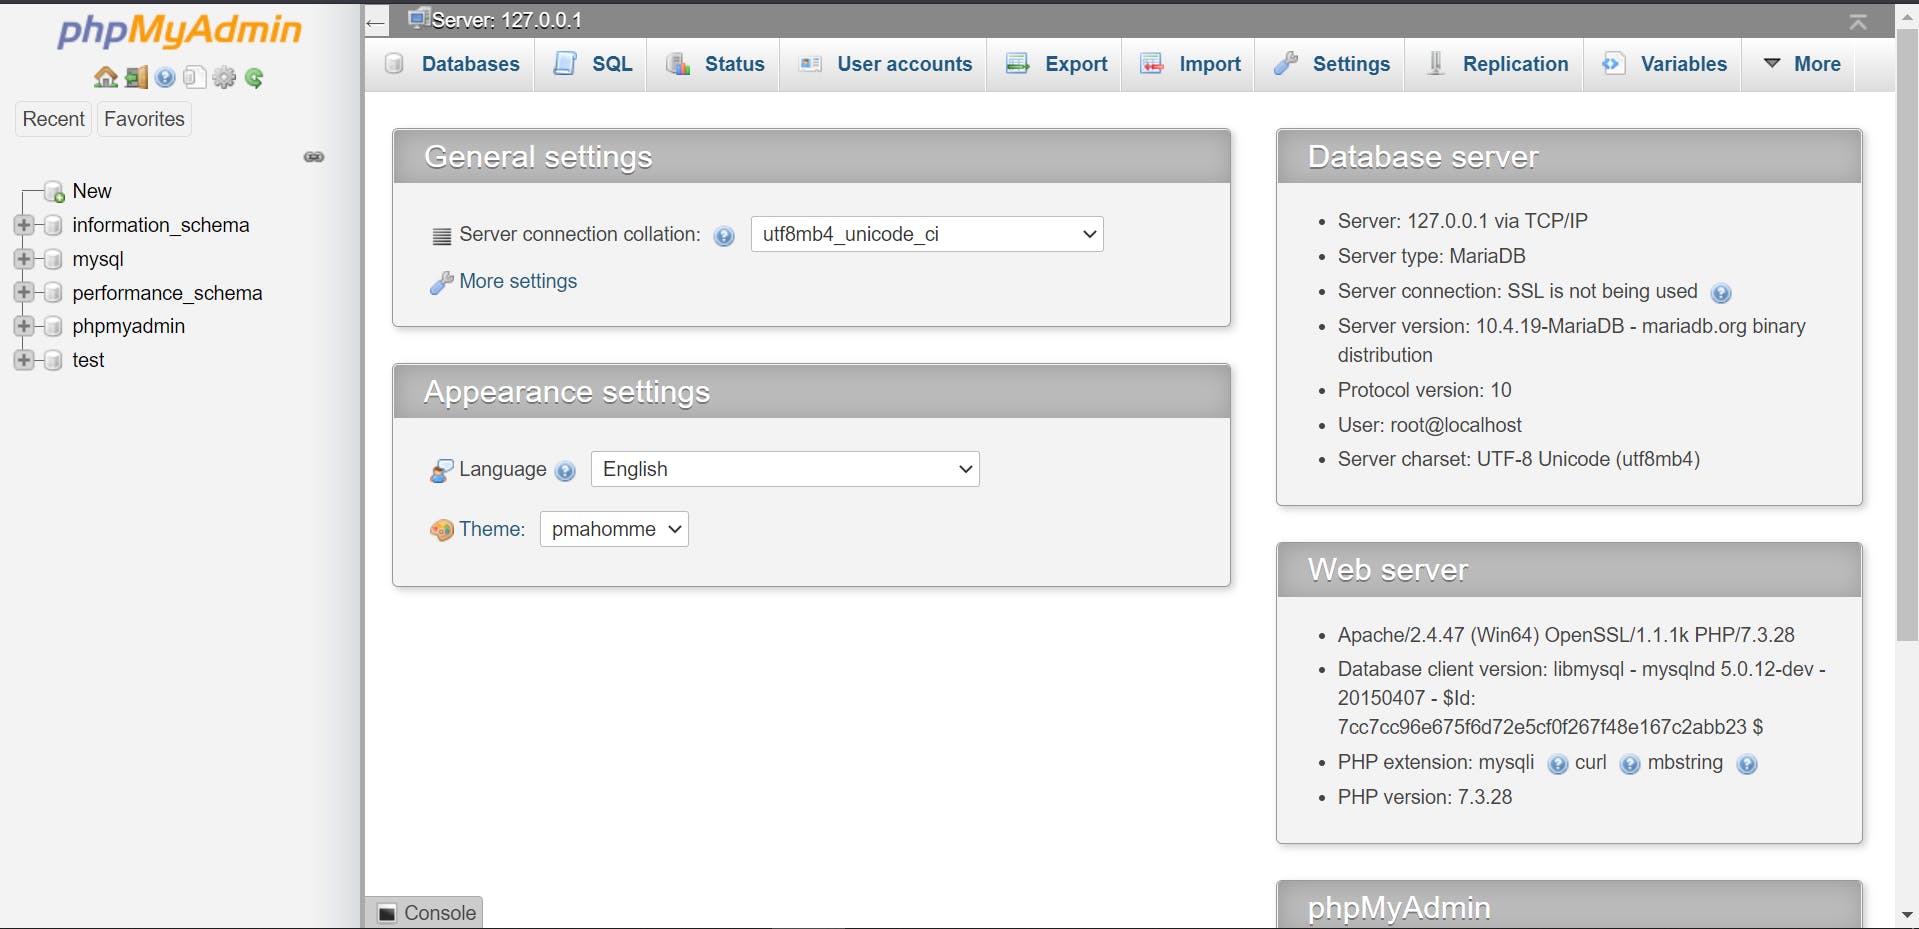
Create a database:
- Click on the New button from the menu on the left side
- Enter a name for your database (here: car_rental_agency)
You'll see your created database without any tables.
There are 2 ways to add tables:
- Use SQL language to add all the tables
- Use the GUI given by XAMPP to add all the tables
I'll be showing you the SQL syntax to add tables using that code
To create a table:
CREATE TABLE `car_rental_agency`.`car_details` ( `car_id` INT(6) NOT NULL , `brand` VARCHAR(20) NOT NULL , `model` VARCHAR(20) NOT NULL , `colour` VARCHAR(20) NOT NULL , `carrier` BOOLEAN NOT NULL , PRIMARY KEY (`car_id`))
Syntax Explanation:
car_detailsis our table name- the words in `` within the parenthesis are the name of the attributes we decided
INT, VARCHAR, BOOLEAN(Read more about data types )are thedata typesof the respective attributes- The numbers in parenthesis
(6, 20)indicate themaximum length of that field NOT NULLensures that while filling data in the tables, none of the fields remain vacant. You can choose to remove this property if it is not required.PRIMARY KEY()denotes the primary key of the table.
After creation of the table, it would look like this:

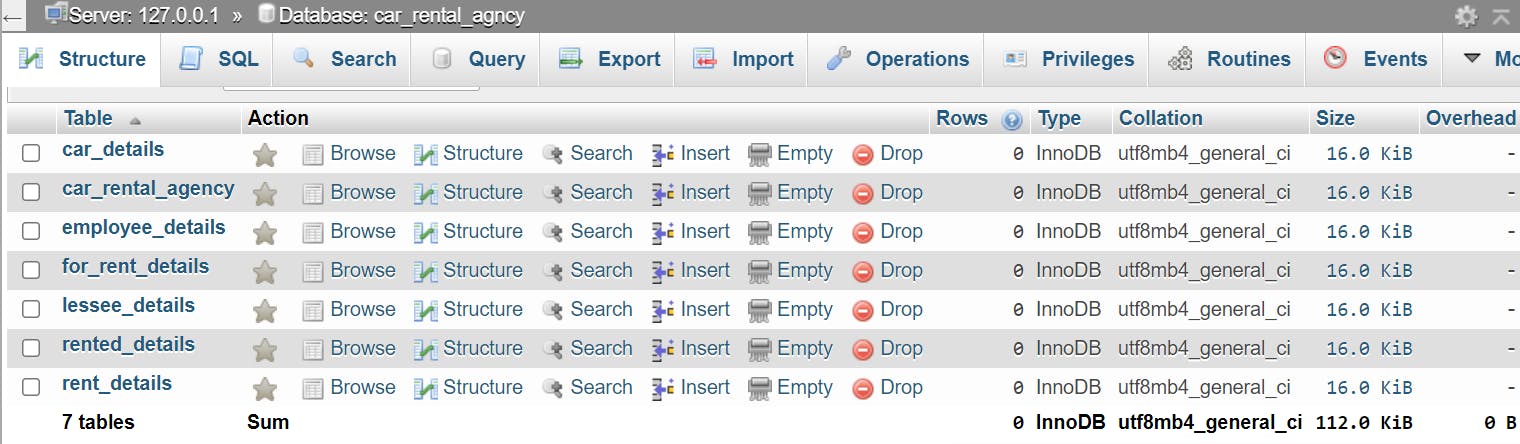
You can also use the XAMPP GUI to add tables, which is pretty straight forward. Now, add all the necessary tables to your database and it would look like this:
Connect the tables to each other
To be able to make the database accessible enough and perform as required, all the tables need to be connected with at least one other table. This can be done by adding the Foreign Key index to the attributes.
Steps:
- Select the table which has a foreign key (here:
for_rent_details) - Enter the table's
Relation View(Structure -> Relation View) - Under the 'Column' section, choose the attribute that acts as the foreign key (here:
car_id) - Under the 'Table' section, choose the table from which the attribute is coming from (here:
car_details) - If there is more than one foreign key, click on
+Add Constraintand repeat from step 3 - Once all the foreign keys have been indexed for that table, click on Save.
You can also check out the code to do the same using the Preview SQL button next to the save button.
The code:
ALTER TABLE `for_rent_details` ADD FOREIGN KEY (`car_id`) REFERENCES `car_details`(`car_id`) ON DELETE RESTRICT ON UPDATE RESTRICT;
Explanation: ALTER keyword informs the system that changes are to be made. ADD FORIEGN KEY indexes the mentioned attribute as a foreign key with a REFERENCE to the table from which the key is coming from.
ON DELETE RESTRICT ON UPDATE RESTRICT are foreign key constraints. This means that when you try to delete or update some data in the table, the engine will reject the operation because it is linked to other tables as well. You can read more about Foreign Key Constraints.
You'll see a 'query successfully executed' message on saving! Connect the rest of the tables similarly.
Let's add some data now!
If you have actual data to add for your database, you can:
- Use SQL syntax to manually enter your data
- Use a
.csvfile and input it directly into the database.
In case you have a sample database like mine, you can use any mock data generating site. I'll be using Mockaroo to input sample data.
We'll start first by filling data for the car_details table.
- Open Mockaroo and you'll see something like this:
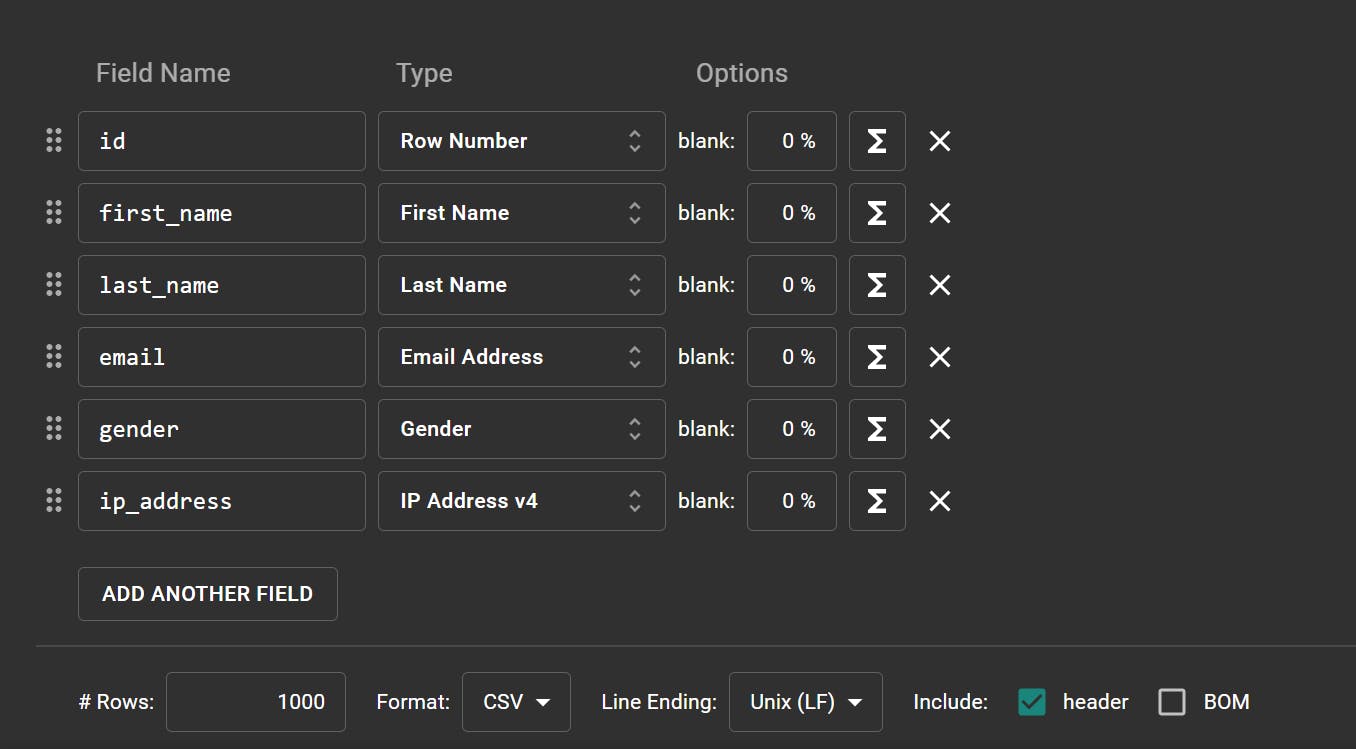
- Now under the column of 'Field Name', enter the attribute names for the
car_detailstable. - Now select the type of data you want to be generated for each attribute:
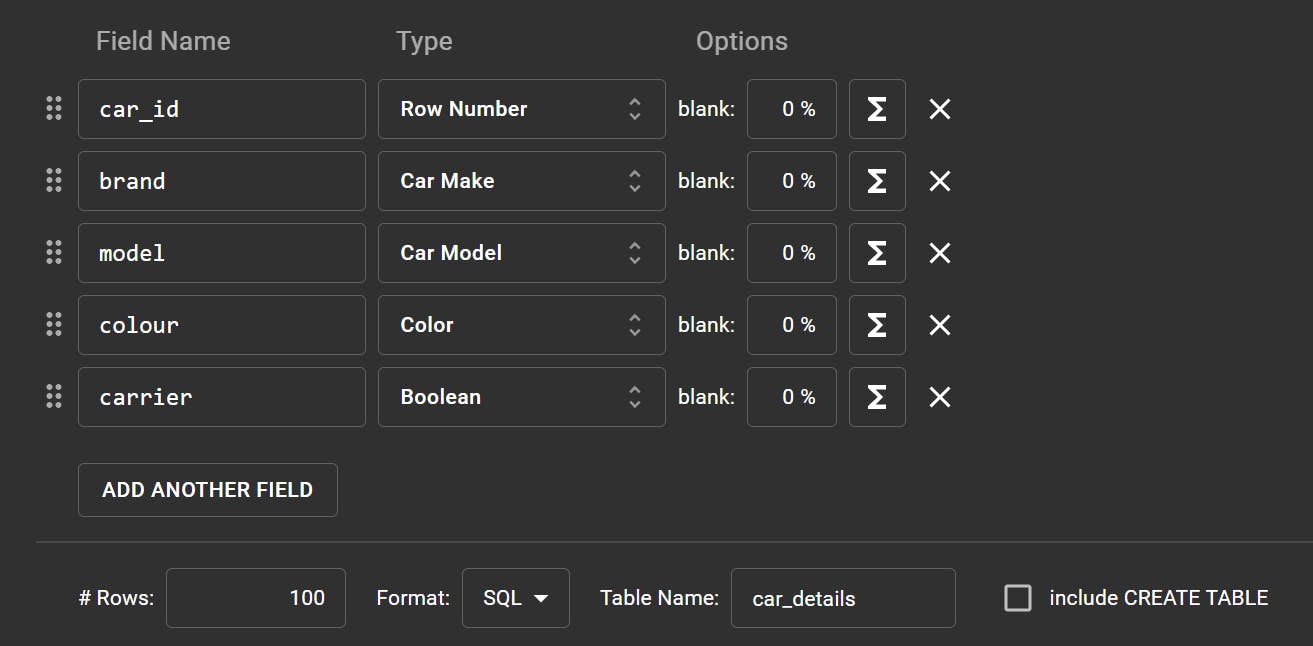
- Once done, make sure your settings are as follows:
"Format" : SQL ; "Table Name": car_details ; - After this click on Preview to see the data generated along with the SQL code for the same.
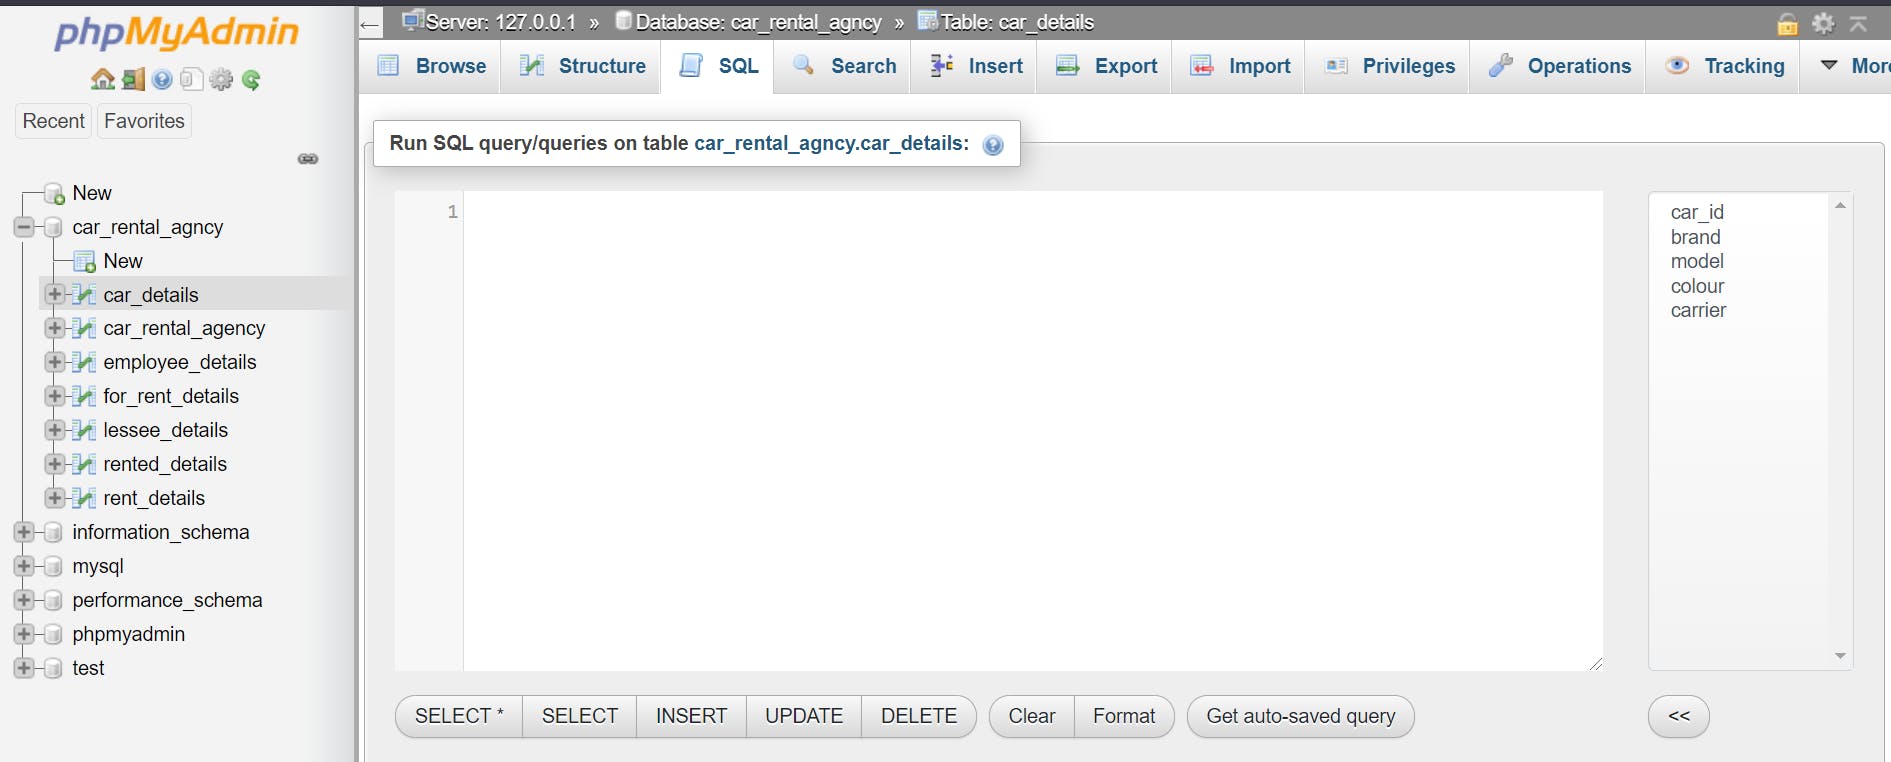
- Copy the code and paste it in the SQL tab of the table in your database:
Data has been added!
Similarly, add data for the rest of your tables.
Now, all the data has been added, you have a database with records you'd like to store and keep track of.
What now? Let's test if it works how you want it to.
4. Perform Queries
Now, while adding data to my tables, I added 50 cars in the 'RENTED' category. This means 50 cars from my agency are currently rented.
However, when you look at all the cars and their properties from the car_details table, you couldn't tell which car is rented and which is not.
Here's what I did:
- Added a new column called
rentedto mycar_detailstable and set the data type toBOOLEAN. - Now, I need to show that the cars from the
rented_detailstable are marked as rented in thecar_detailstable. - Supposed the
car_ids 1-50 are rented (see how we used the IDs to recognize cars and don't have to think twice about car and models and stuff), now we need to change their value. - I'm taking value 1 as rented and 0 as for-rent. Here is the code to update the same:
car_rental_agency database -> SQL and type the following code:
UPDATE car_details
SET rented = 1
WHERE car_id < 51
Explanation: UPDATE keyword triggers that some values need to be updated. SET keyword tells what column needs to be set to what value. WHERE keyword specifies the condition that needs to be met in order to update values of the column.
Updated table:
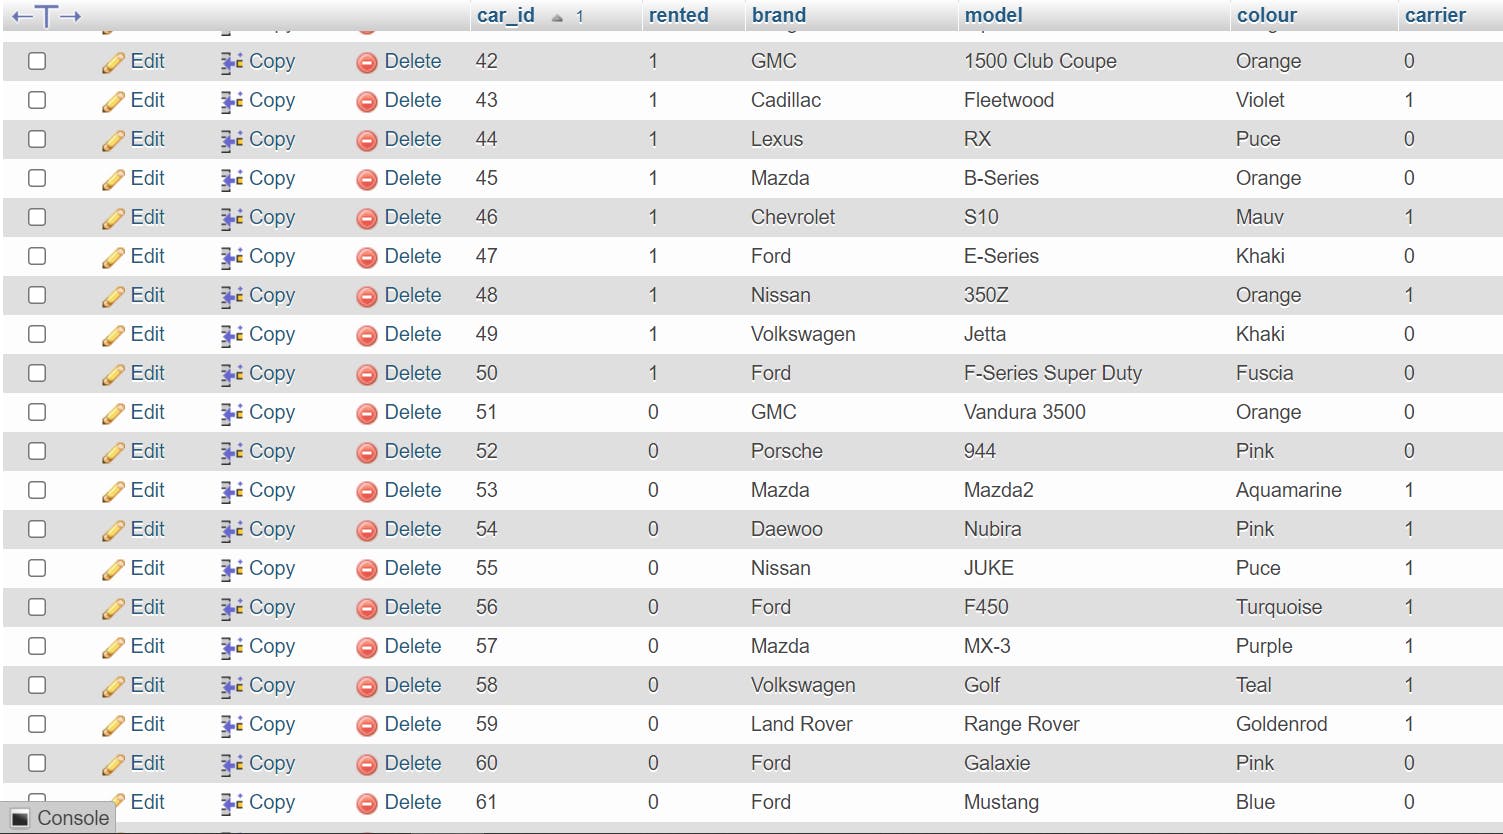 Now you just need to look at the
 car_details table to check which car is available and which is not.
Similarly, you can link the rented cars to the lessee using car_id and lessee_id attributes. Try this on your own.
Let's run one more query before we wind this up.
Suppose you want know a car's rent and how many days it is available for:
What do you need?
- The car ID of the car you're interested in.
That's all? Yes, it is enough.
Here is the code to access this information:
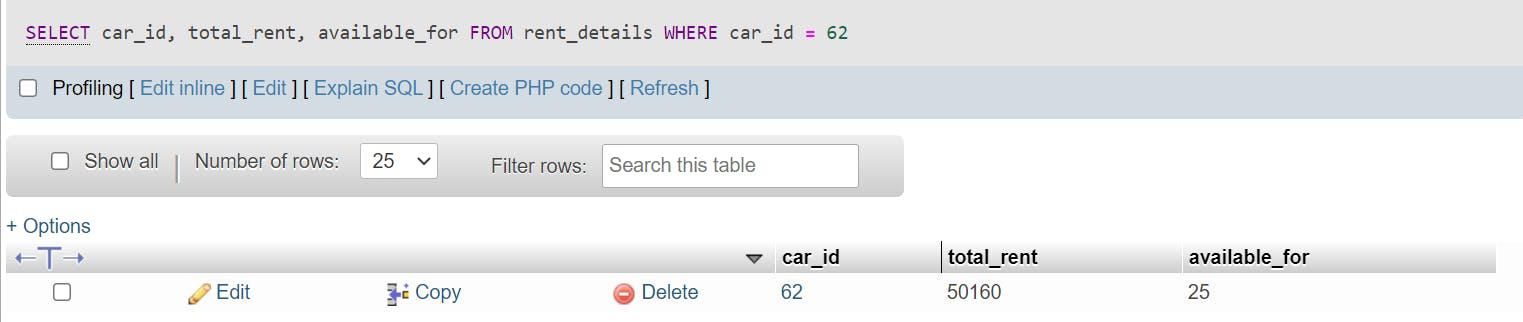
SELECT car_id, total_rent, available_for
FROM rent_details
WHERE car_id = 62
Explanation: SELECT keyword selects the columns that you want in your output. FROM keyword specifies the table name from which you want the above mentioned columns. WHERE keyword mentions the condition.
Output:
That was some tutorial, huh?
Like I mentioned earlier, this is my very first technical blog so I hope you were able to understand it enough to use it some day.
My goal with this is that even a layman is able to at least understand the basics of what a database entails and maybe even understand how you can create one.
There are, of course, better and shorter ways to do this, but this tutorial explained the most ground-up approach.
Hopefully, you learnt a thing or two!
If you liked it, feel free to like, comment and share the article!
Thank you for reading!